
There are many different opinions about the best nestboxes for rabbit production. Some are based on experience, but many are not. The following information is based upon experience in rabbit production in Arizona. Some locations (like extreme cold areas) may need extra considerations. But the size and many features can be utilized no matter where you live.

Material
The preferred material for nest boxes is wood (3/4" thick). Make sure the wood you use is untreated as the rabbits will chew on it from time to time. This is not a bad thing, but will require the nest box to be replaced after a few years. The reason wood is preferred is because it is a natural product that excels in insullation, customization (ability to cut it, assemble it to exact measurements, add components, etc.) and weight. And good quality wood will last much longer than cheaper wood.
The floor of the box is 1/4" x 1/4" hardware cloth (wire). This has the benefit of holding bedding inside while allowing urine to drain through the bottom. It not only keeps the nestbox cleaner, it also helps eliminate possible health problems and keeps noxious ammonia smells to practically nothing.
Wood glue and nails (nail gun) and staples (staple gun) are used for assembly.
Hanging hooks are also highly recommended so that the box stays in one place in the cage at all times and doesn't move around, potentially harming small kits.
Measurements
The dimensions are of the nest box for meat production rabbits (like New Zealand Whites, Californians, Palominos, Americans, etc.) are:
- Length: 18"
- Width: 10"
- Height (sides and back): 10"
- Height (front): 6"
- Roof depth: 8"
The sides will slightly taper up from the 6" height to the 10" height, before reaching the roofed area.

You'll need to purchase 3 different sized boards (unless you have the equipment to cut your own widths). The sides and back will be 10" wide boards. The roof will be 8" boards and the front 6" board. So for each nestbox you'll need:
- 46" length of 10" board
- 10" length of 8" board
- 10" length of 6" board
The total number of boards will depend on the length of boards you get and how many you plan on building. It is recommended that you build several at the same time for efficiency.
Sides

For the sides, cut 2 pieces from the 10" boards, 18" long. The tapered part (from the height of the front board toward the middle) can be a gradual cut (like pictured) or it can just be the corner cut, whichever you please. We prefer having the cut rise gradually just because it looks better. It doesn't really change any functionality benefits either way.
Back & Front

For the back, simply cut another piece of the 10" board to 10" long. This will fit between the two sides.
The front will be cut from the 6" board to the lenght of 10" as well. Use glue and nails to connect the two sides to the back and front pieces.
For the roof, you'll use the 8" board, cut to 10" in length. This will be glued and nailed between the two sides and the back.
Tip: Some find it easier to assemble the front, back and roof to one side first, then attach the other side last. This is particularly easier when one of the pieces is slightly longer, making it more difficult to slide in the roof.

Floor
For the flooring, use 1/4" x 1/4" hardware cloth (wire). Like previously mentioned, this allows the nestbox to stay dry and more sanitary. This is by far the best method we have used and highly recommend it.
Lay out the hardware cloth over the bottom of the box and cut it out to the proper measurement with scissors. Then lay it out, properly centered, over the bottom and staple it to the box. Use a hammer to pound the staples down flush if needed after completed.

Hooks
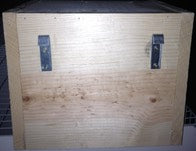
Using hooks allows the box to remain in the same position in the cage until the box is removed. This adds to the safety of the young kits as they begin exploring outside the box and keeps them from getting smashed or trapped. It also maximizes the area of the cage by having the box remain in the corner instead of moving the middle of the cage. The hooks we use are purchased through Klubertanz.
To install the hooks, put the box in the cage and then mark where the hooks should go with a pencil. Proper placement allows the box to hook to the cage wire but also allow the box to sit flush on the floor.
Bedding
After experimenting with various types of bedding materials, we have found that using pine shavings on the bottom and then Timothy hay on the top works best. The pine shavings provide great insulation (mixed with the rabbit's own hair) for the 2 to 3 weeks until the box is removed. The Timothy hay adds to the insulation and allows some rabbits to create a "hole" in the box. It is also eaten by the young rabbits before leaving the box and helps their digestive system get started for solid food (along with the mama rabbit's feces).


Using Nestbox
The nesting box should be put in on day 28 (3 days before scheduled kindling). We put it in on the evening of day 28. Putting the box in earlier often results in losing much of the bedding due to the rabbit's messing around in it or the rabbit using it as a litter box.
Fill the box with soft straw, hay and/or pine shavings about 3 days before the doe is due. She'll pull hair out of her dewlap (the roll under her chin) and make a cozy bed for her young. They should arrive within 28 to 31 days after being bred (usually on day 31).
The doe will spend most of her time outside of the nest box and only return to feed them twice or so a day. After 3 weeks the kits should be hopping in and out of the box often and you can safely remove the nest box from the cage. We have found that at 3 weeks the box is no longer being used by the kits and is just taking up space in the cage. Be sure to clean and sanitize your nest boxes between uses. It is also recommended to assign a nestbox for each doe to avoid possible cross-contamination (if supplies allow).